
Go away BitLocker, you´re drunk
This time we want to try to do some hardware hackery stuff and attack BitLocker encrypted drives where TPM is used but no additional factor like a PIN or password.

Introduction
During the last couple of months I stumbled upon a few articles and tweets where people were extracting cryptographic keys for BitLocker directly from the bus the TPM was talking on. They did so by hooking up a logic analyzer directly to the TPM or some other chip connected to the according bus.
This is the stuff that made me write this blog post:
https://pulsesecurity.co.nz/articles/TPM-sniffing by Denis Andzakovic
https://twitter.com/SecurityJon/status/1445020885472235524 by Jon Aubrey
https://dolosgroup.io/blog/2021/7/9/from-stolen-laptop-to-inside-the-company-network by DolosGroup
https://labs.f-secure.com/blog/sniff-there-leaks-my-bitlocker-key/ by Henri Nurmi
All credits go to you guys, thanks for sharing your knowledge :)
As I thought to myself that this is really cool shit and I wanted to see it with my own eyes, I hesitated no longer and plunged into the adventure.
Basics
BitLocker is Microsoft’s full volume encryption feature build into Windows since Vista.
One can run it in three modes:
1. Transparent operation mode: The decryption keys are sealed inside a TPM
   and released during the boot process when several checks are passed regarding tampered boot files and stuff.
2. User authentication mode: Here a user needs to provide some sort of additional authentication during the boot process,
   e.g. a PIN or password.
3. USB key mode: The decryption keys are stored on a USB device, which needs to be present in order to decrypt and boot the system.
This leaves us with the following possible combinations to run BitLocker:
TPM only
TPM + PIN
TPM + PIN + USB Key
TPM + USB Key
USB Key (only with changes to GPOs)
Password (only with changes to GPOs)
The Trusted Platform Module TPM is a cryptoprocessor bound to a specific device. It is capable of holding cryptographic keys, and so BitLocker can be used with keys stored in this module. When no form of preboot authentication is in place, the TPM will release the keys during the boot process, in order to decrypt the disk automatically. Depending on the TPM device itself and regarding the official documentation, it will communicate over the LPC, SPI or I2C bus.
The Volume Master Key VMK is BitLocker’s cryptographic key held by the TPM. However it is only used to decrypt the Full Volume Encryption Key FVEK, which is responsible for actually decrypting the data.
“The addition of the volume master key allows the system to be re-keyed easily when keys upstream in the trust chain are lost or compromised. This ability to re-key the system saves the expense of decrypting and encrypting the entire volume again.” More on this here.
The attack I’ll describe only works when no preboot authentication is in place, and the keys are released automatically when the according checks are passed. This is a combination often to be found in real life because:
- BitLocker is included for free - so why pay for an alternative solution
- Out of the box there is no SSO in combination with MFA available for BitLocker (you would need to implement & buy some 3rd party tools)
- Users get mad when they need to authenticate more than once when starting their devices
And this is where good ol’ MS is telling you that users can have a nice SSO experience by using TPM only and that you should try to avoid bothering them!

“This protection should not be cumbersome to users. One undesirable and previously commonplace situation is when the user is prompted for input during preboot, and then again during Windows logon. Challenging users for input more than once should be avoided. Windows 11 and Windows 10 can enable a true SSO experience from the preboot environment on modern devices and in some cases even on older devices when robust information protection configurations are in place.”
https://docs.microsoft.com/en-us/windows/security/information-protection/bitlocker/bitlocker-device-encryption-overview-windows-10
The journey begins
I´ll be honest with you. In first place I just partly red the articles referenced in the intro section. The only thing that got me and what I understood was: You can buy an ICEStick for 40$ and make it read all the VMKs, when reading Denis blog.

So I bought the ICEStick which now is more like 80$ instead of 40$ (thanks chip shortage you lil’ asshole), had a really hard time getting all the tools and stuff working (there are a million ways of doing the same stuff), only to find out that the config Denis wrote for it, was only capable of reading LPC messages and extracting the VMK out of them.
Guess what - the test notebook I had was using SPI. Fuck. There goes my dream of a 40$ tool that’s doing all the magic stuff to the TPM, no matter what device you throw it at. I spent some hours searching for solutions to make it talk and read SPI, but gave up as this is too deep down the rabbit hole for me.
So off to plan B. Denis also describes how he used a DSLogic Plus to do all the stuff on a TPM 1.2.
Great I thought to myself, they tell you something about refunds if not satisfied and 150$ is okay. So the device arrives, I head over to Denis blog again aaaaaaaand - yes this variant was using the LPC bus as well.

But wait, there is also a High Level Analyzer for the sigrok project available for TPM 2.0 and SPI. The problem with the DSLogic is, that it only has very little memory to buffer data, and for stream mode it only supports USB 2.0, which would allow us to catch some seconds on 4 channels with 100MHz.
Let me quickly check that. I need 5 channels. Frustration is rising.
But Denis ran into the same problems. The solution for him was to capture the clock signal separately.
I was able to do the same, hack together the data, and finally had everything I needed.
Mission complete one would guess. But not for me.
I did like 100000000000000000 test runs capturing data and clock. Sometimes the SPI decoder got me readable data, sometimes it didn´t. What never gave me data was the VMK extractor. I tried with DSView as well as PulseView - no chance.
I thought okay, write the nice people from DSLogic that you would like to send back the device and have a refund.

I even thought about buying the larger U3Pro16 device for 300$, which has more memory and can stream over USB 3.0. I offered them to do some colab on this blog and asked if they would offer me a discount for that.
No answer.

This. ladies and gentlemen, is how bad customer support looks like, thanks for nothing.
In parallel I struggled to buy the Saleae Logic Pro 8, because it´s the most expensive one, but was used in some of the other write-ups successfully.
I asked on twitter if someone had a used device, willing to sell it to me, but got no response.
This was the point when Tim from Saleae reached out to me (I also marked them in my search for a used device), telling me about some possible solutions to my problem. This ended up in me owning a Logic Pro 8 now. This, in comparison, was really good customer support, and it really felt like they were taking care of me, so it´s probably worth spending the money on the Logic Pro 8.
Attack - Step by step
Let’s now head over and get our hands dirty.

Things I used
- DELL E5450 with a TPM running on the SPI bus, Windows 10 and BitLocker in TPM only mode
- Saleae Logic Pro 8
- Logic 2 Analyzer Software
- Henris BitLocker SPI Toolkit
- BoardViewer Software
Recon
The first thing we need to know is what TPM chip is installed, which bus it is using and which other components might be connected to that bus, if we can’t or don’t want to connect to the TPM directly.
I started by disassembling the whole notebook (the official guide was a real help), reading the marks on the mainboard and do some googling. This eventually led me here:
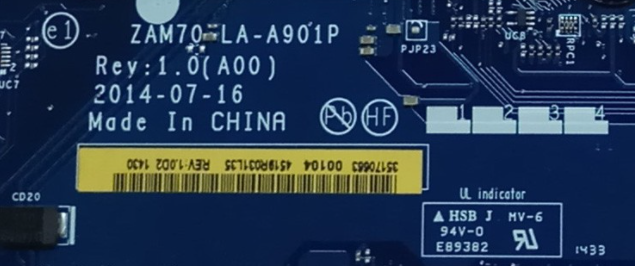
Googling ZAM70 gave me these technical details: https://www.hisahtech.com/wp-content/uploads/2020/05/ZAM70-LA-A901P-r03-Dell-Latitude-E5450.pdf
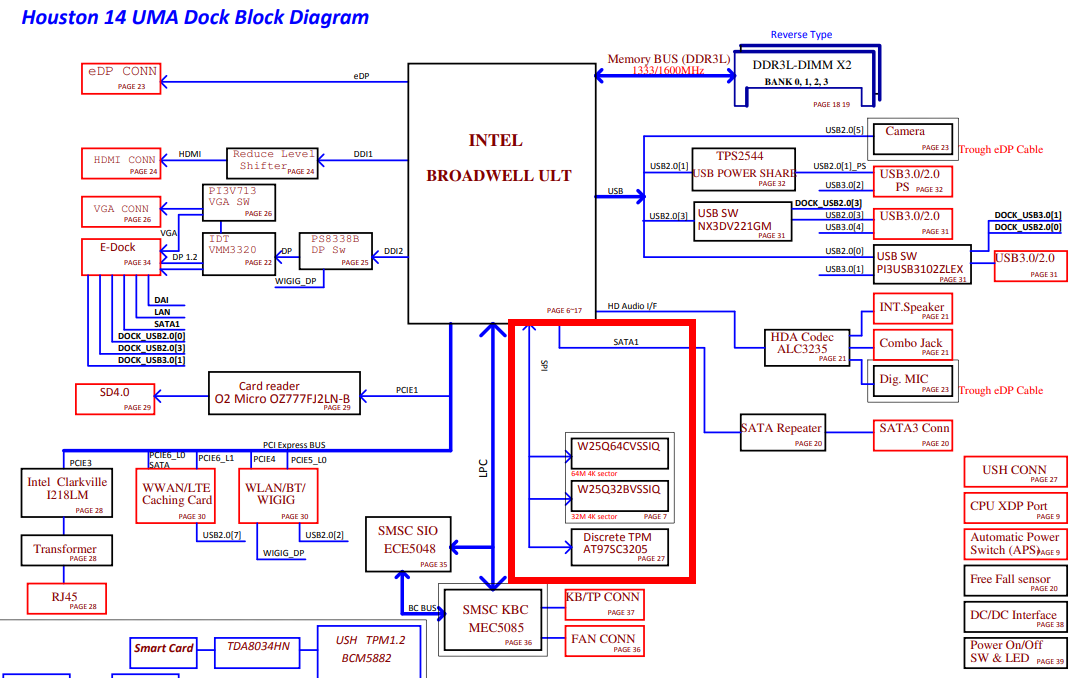
So on the first page we can see that we have an Atmel AT97SC3205 TPM chip running on the SPI bus, to which two flash chips W25Q64CVSSIQ & W25Q32BVSSIQ are also connected:
On the site with the TPM in detail, we can see which pins are connected to which lines and that it is running on 3.3V, which should become a crucial detail later on.
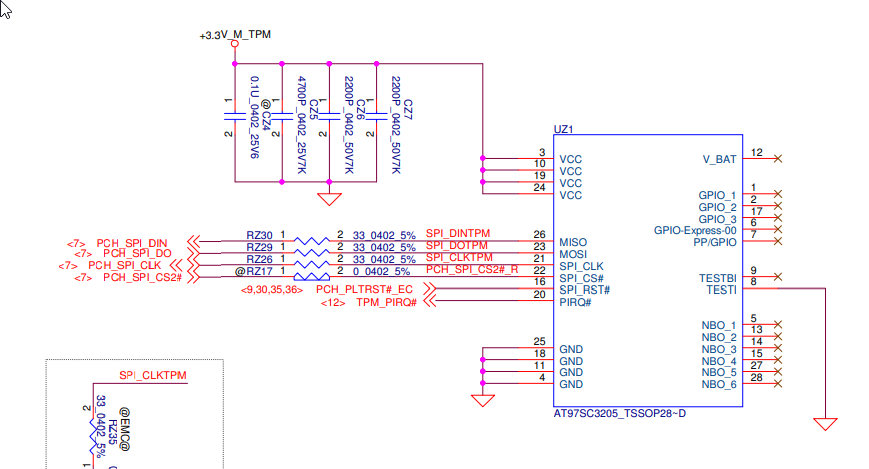
I double checked with the original documentation from Atmel.
This is what the chip looks like on the motherboard:
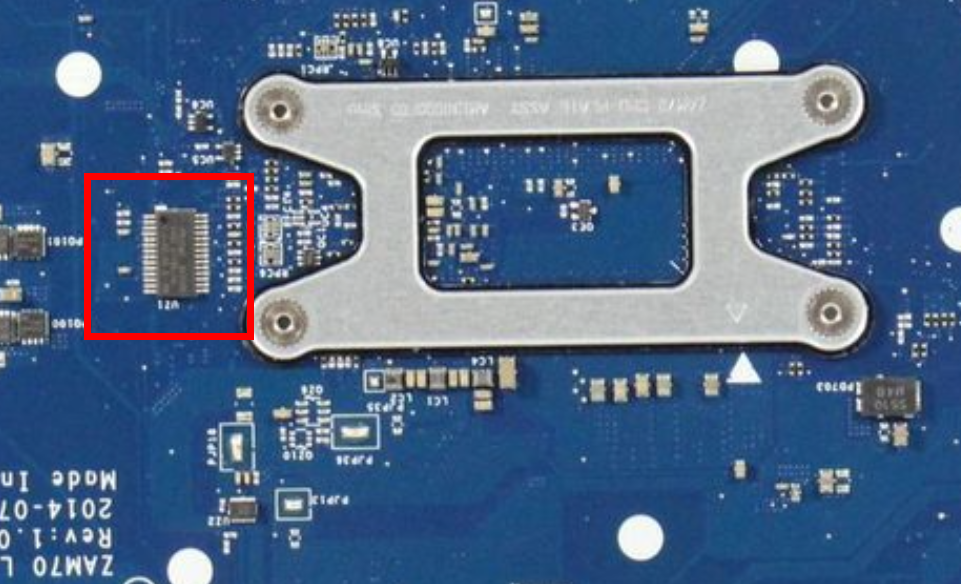
As you can see, there is no way to attach probes to the TPM directly.
Option A would be to solder flyleads to the small pins of the TPM, and option B to search for another way to access the SPI bus.
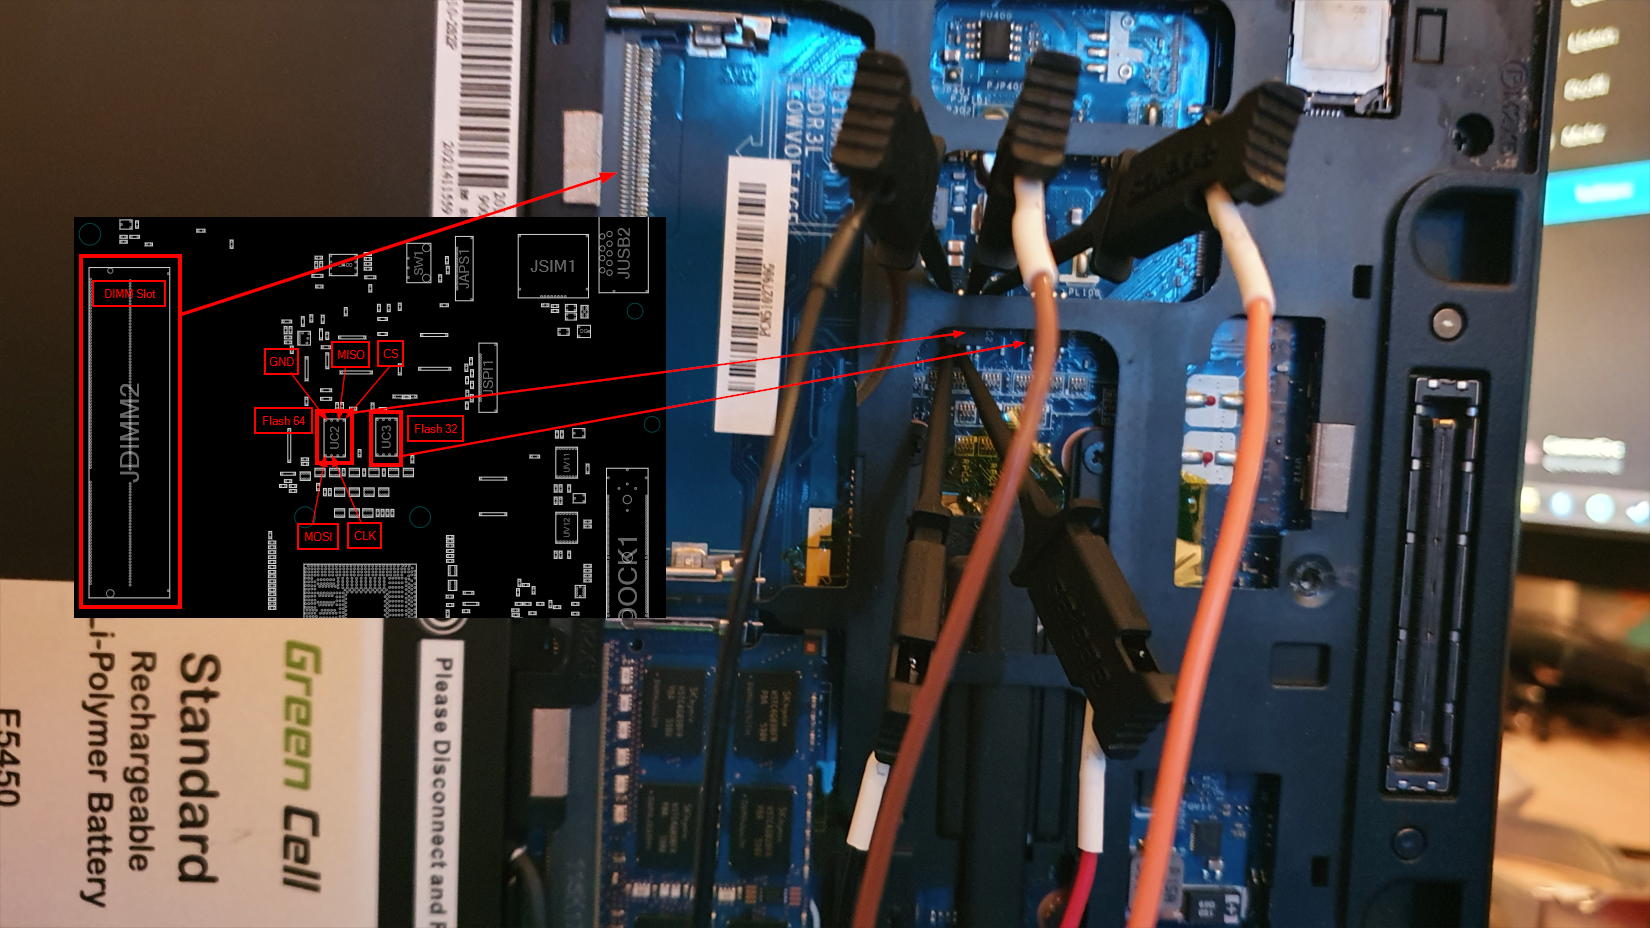
This is where BoardViewer comes into play. The program allows you to load schematic views of boards, where you can interactively search or click on pins and see where they are connected to. I found the CAD file for the E5450 here.
The TPM is the device UZ1 in this case, located at the top side of the mainboard:
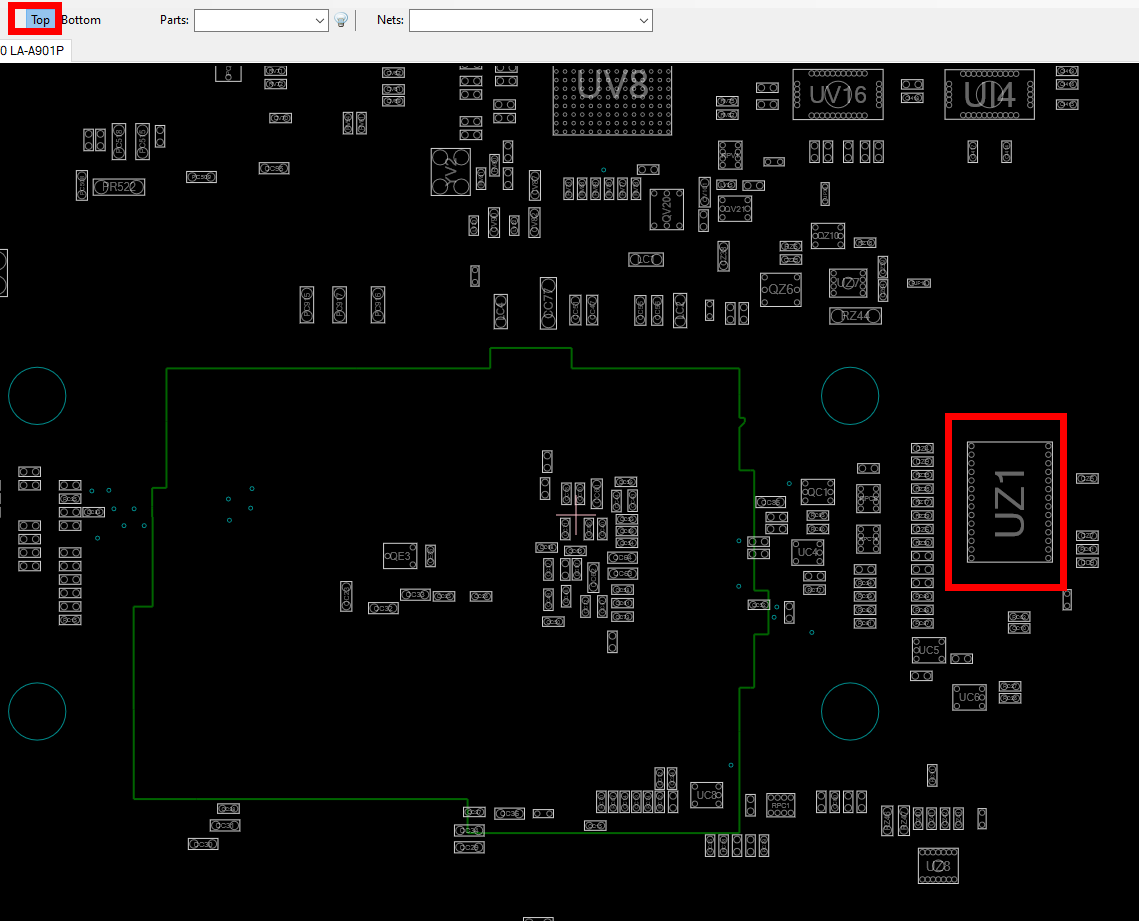
Selecting the chip will give us all pins and the according lines they are connected to, as well as other endpoints that are connected to these lines under the “Net” ribbon. In this case we selected pin 21, which is the clock signal for the SPI bus, which also is connected to RZ35 and RZ26:
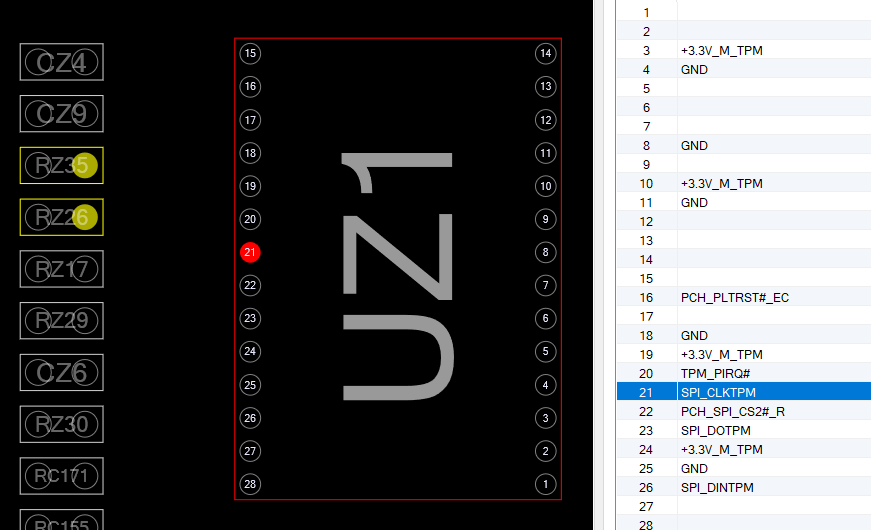
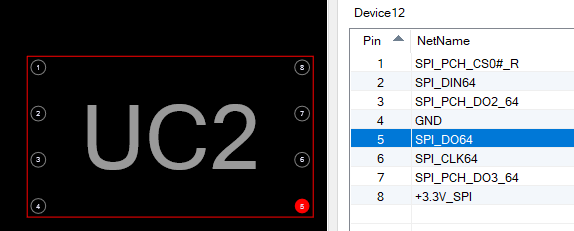
When we follow e.g. pin 23, which is the SPI_DOTPM, we can also see that it is connected to the JSPI1 module on the backside of the mainboard, which in the end leads us to the UC2 chip that happens to be one of the two flash chips connected to the SPI bus. These flash chips are in SOIC8 format, and much easier to access with our probes than the TPM itself.
Wiring things up
So now it’s time to figure out what line is which in terms of SPI, and hook up our logic analyzer.
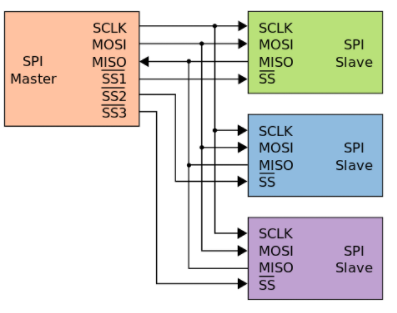
In order to be able to decode the SPI signals, we need a clock signal, MISO, MOSI and Channel Select. On the SPI bus there are master and slave devices. For each slave device there is a separate Channel Select line. The master selects to which slave he wants to communicate by grounding the according line.
In this case we have:
Pin 6 SPI_CLK64 is the clock signal
Pin 5 SPI_DO64 is MOSI
Pin 2 SPI_DIN64 is MISO
Pin 1 SPI_PCH_CS0#_R is Channel Select
Pin 4 GND is ground (we need that in order to not mess up with the signals)
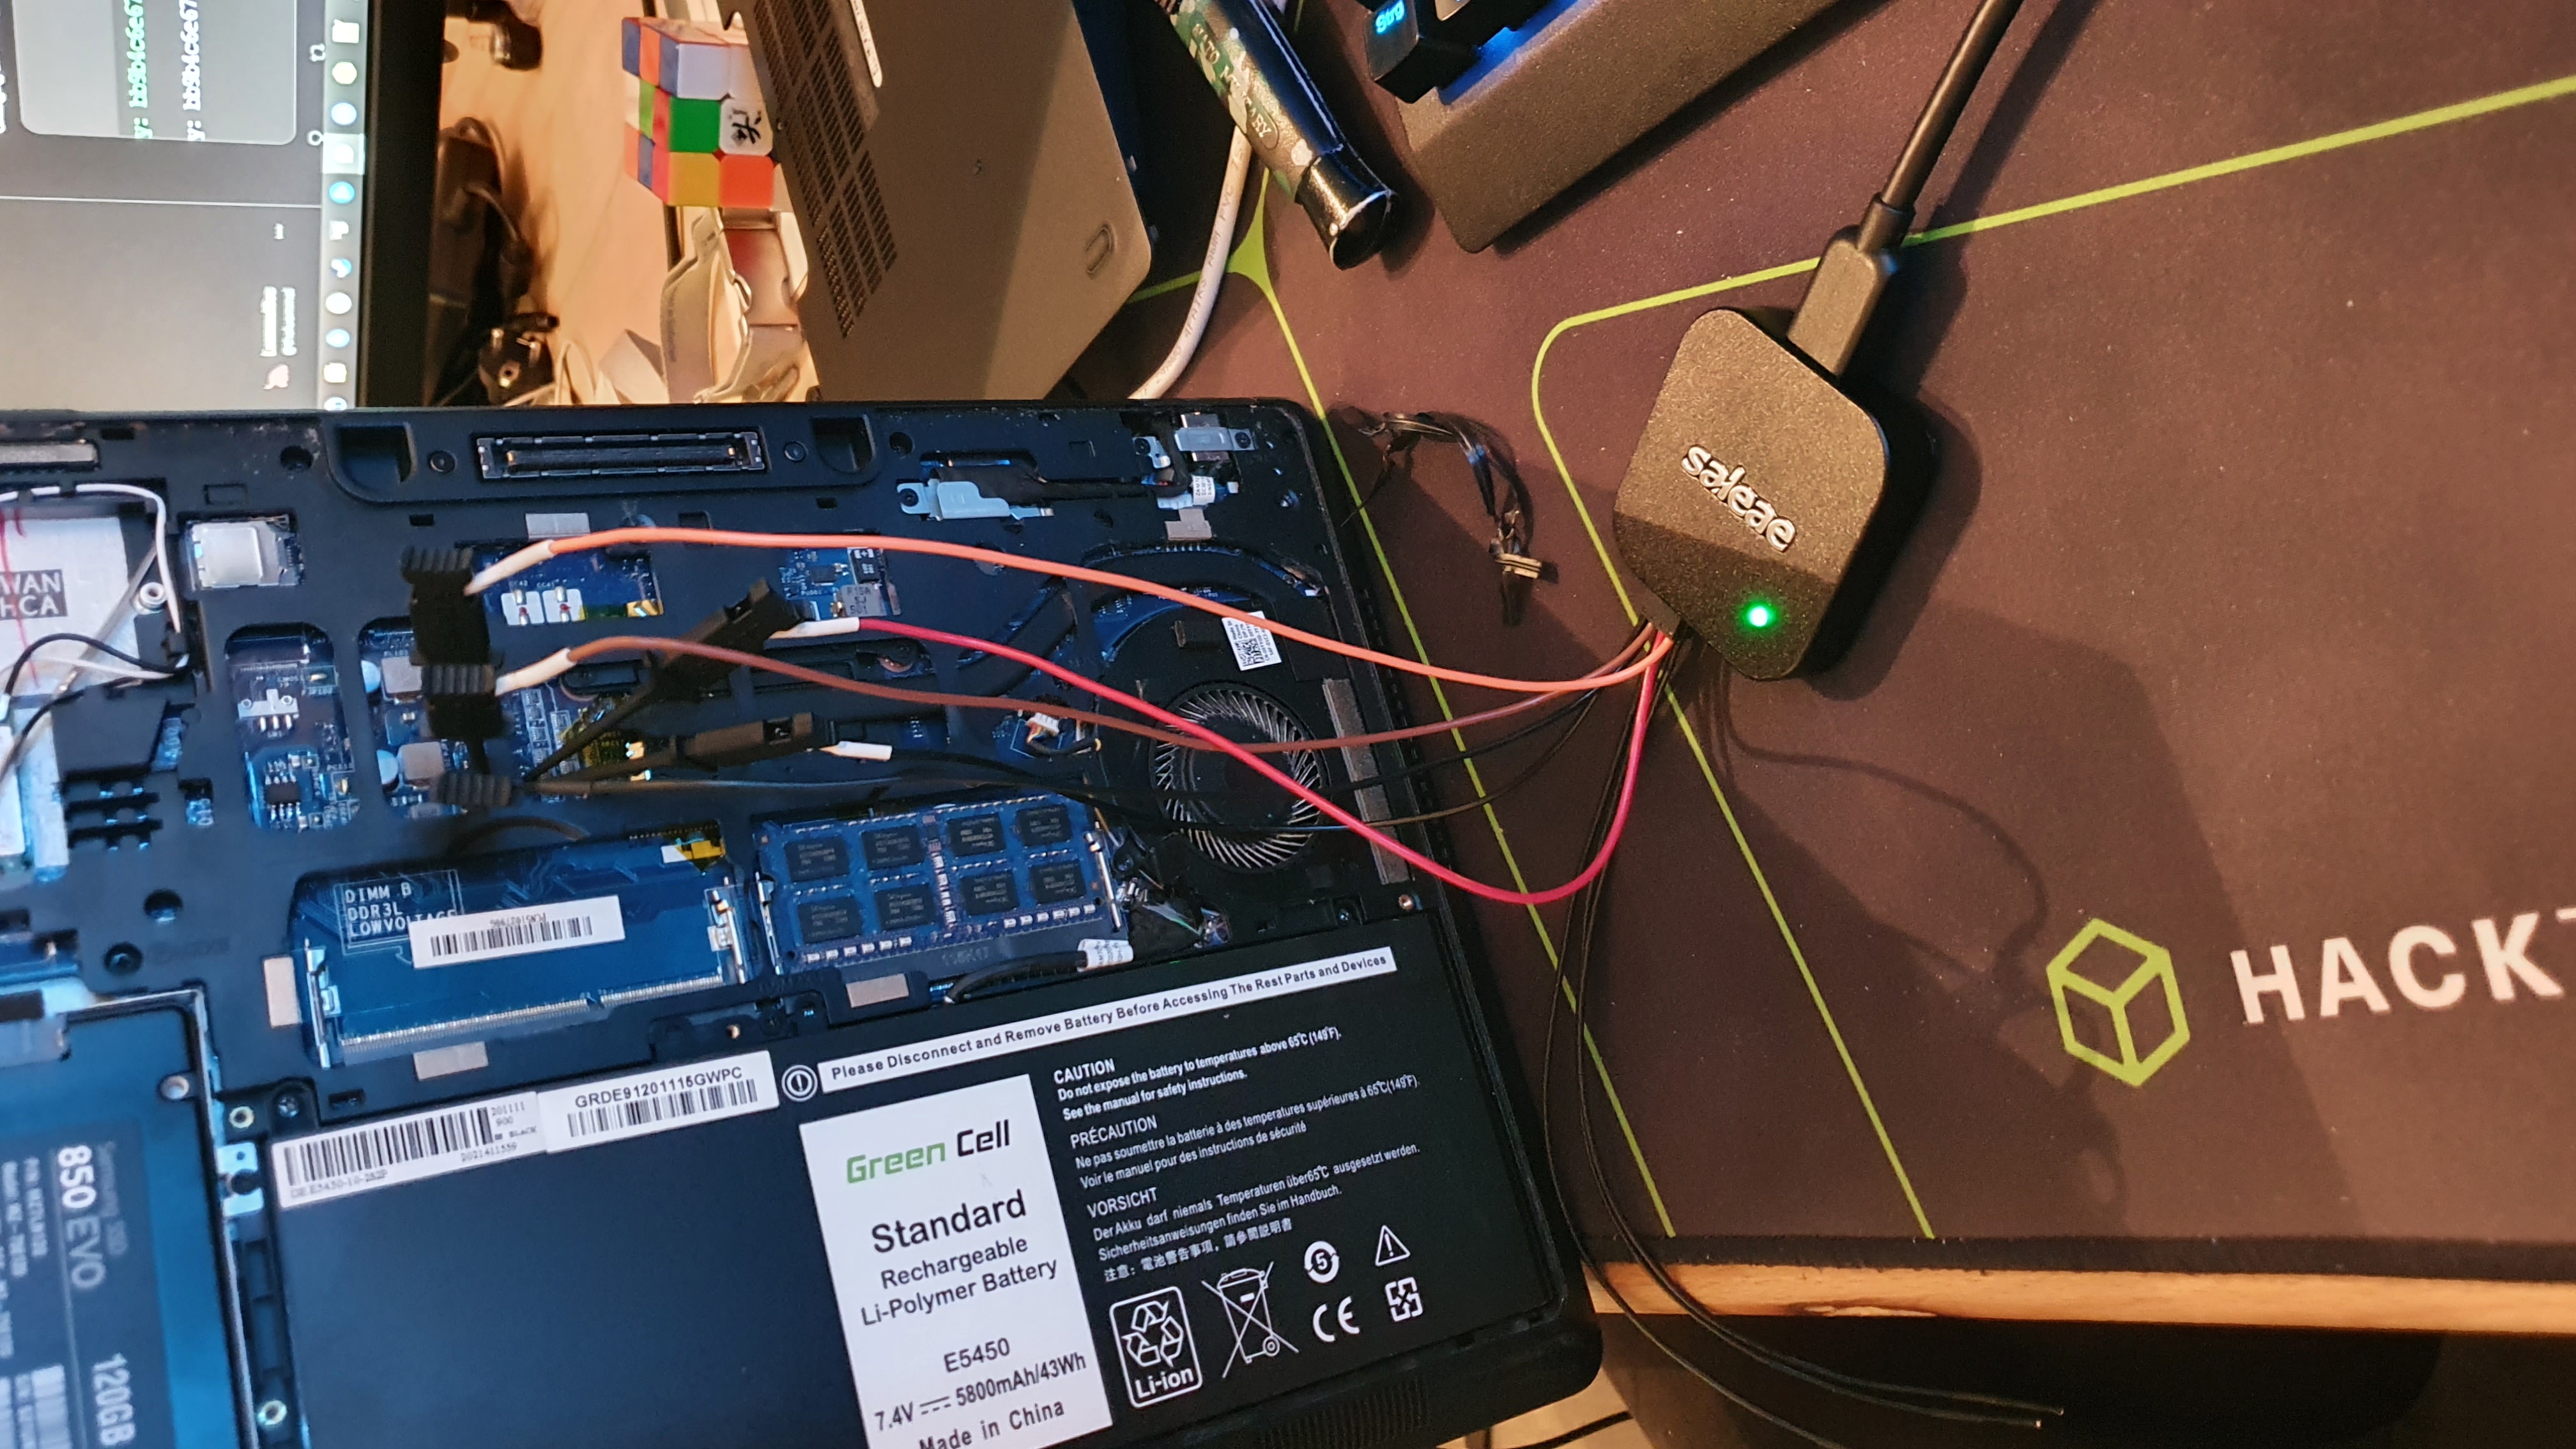
Now we can attach the probes from the logic analyzer to the flash chip, which is accessible by just removing the back cover of the notebook. I always found it usefull to have some bigger points of orientation to find the correct chips. In this case the two RAM slots were of great help.
Next we fire up Logic 2. Here we need to prepare a few things.
-
Install the High Level Analyzer from Henri:
Git clone or download the repo
Add a custom extension: Extensions -> Load Existing Extension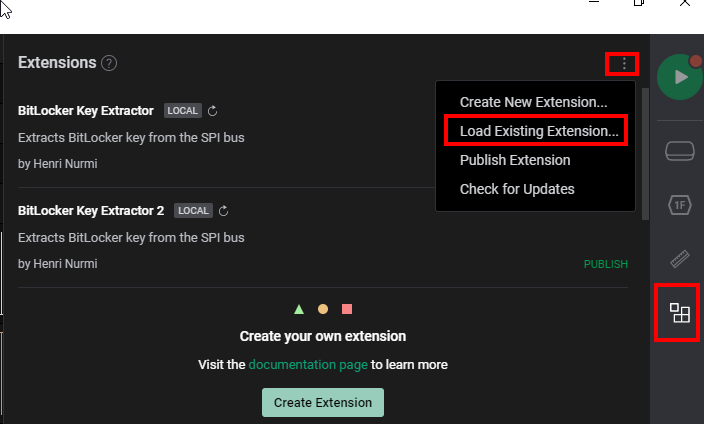
Select the BitLocker Key Extractor Extension
-
Under the device settings select:
Correct Voltage (this cost me hours of troubleshooting as I first didn’t pay attention here, and let it at 1.2V which gave nothing but bullshit)
Enough RAM for buffering, I used 4GB
An according sample rate. The rule here is to use at least 4 times the rate than the actual signal, which in this case is running at a max of 33MHz, so we should at least select 125MS/s, but I went with 250MS/s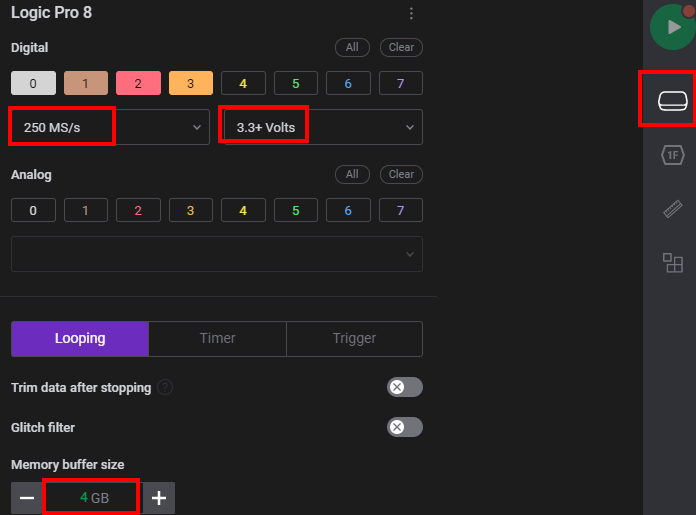
-
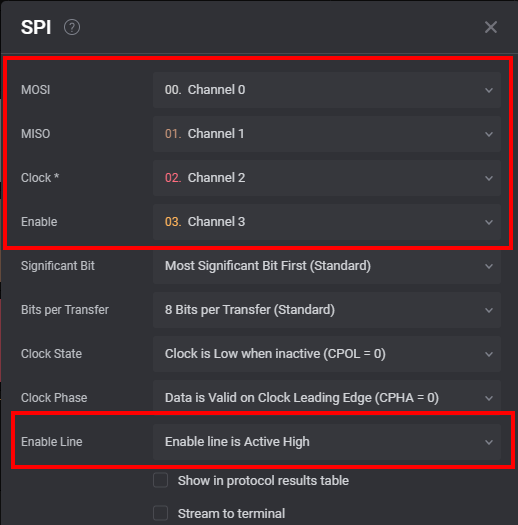
Setup the SPI decoder, so that we have the correct lines assigned and also have Channel Select on active high. The reason here is, that we are on the Channel Select line of the flash chip, and not the one of the TPM. As such we have a Channel Select for the TPM in the opposite way, although we will also catch the signals for the 2nd flash chip, but this is no problem.
The actual attack
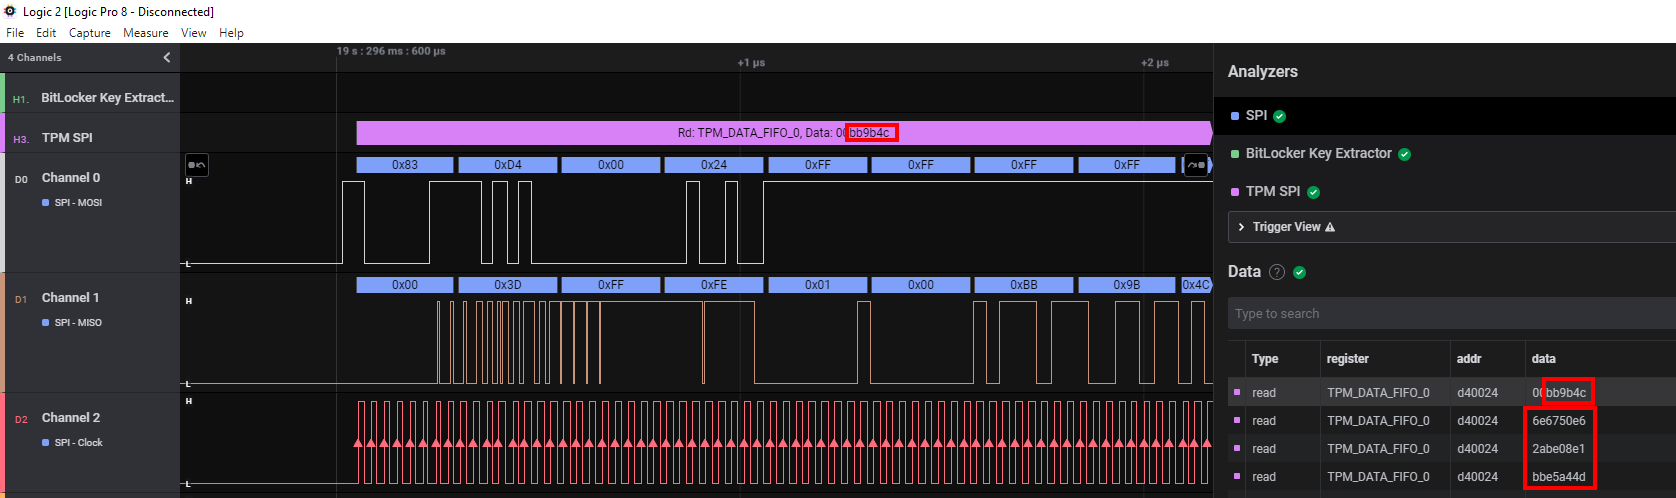
Now things are getting serious. With everything in place it’s time to start the logging process and fire up our notebook. We should see lots of SPI messages coming in. In regards to the TPM stuff, we are only interested in READ messages from the register TPM_DATA_FIFO_0, which acts as a buffer for exchanged messages on the SPI bus. BitLocker only makes use of the locality 0, which brings everything down to the before mentioned register, where the VMK will be transferred. Henri’s HLA will just look at this register for the BitLocker VMK structures, that are defined as follows (and can be found here):
The header data will start with this 2c000[0-6]000[1-9]000[0-1]000[0-5]200000
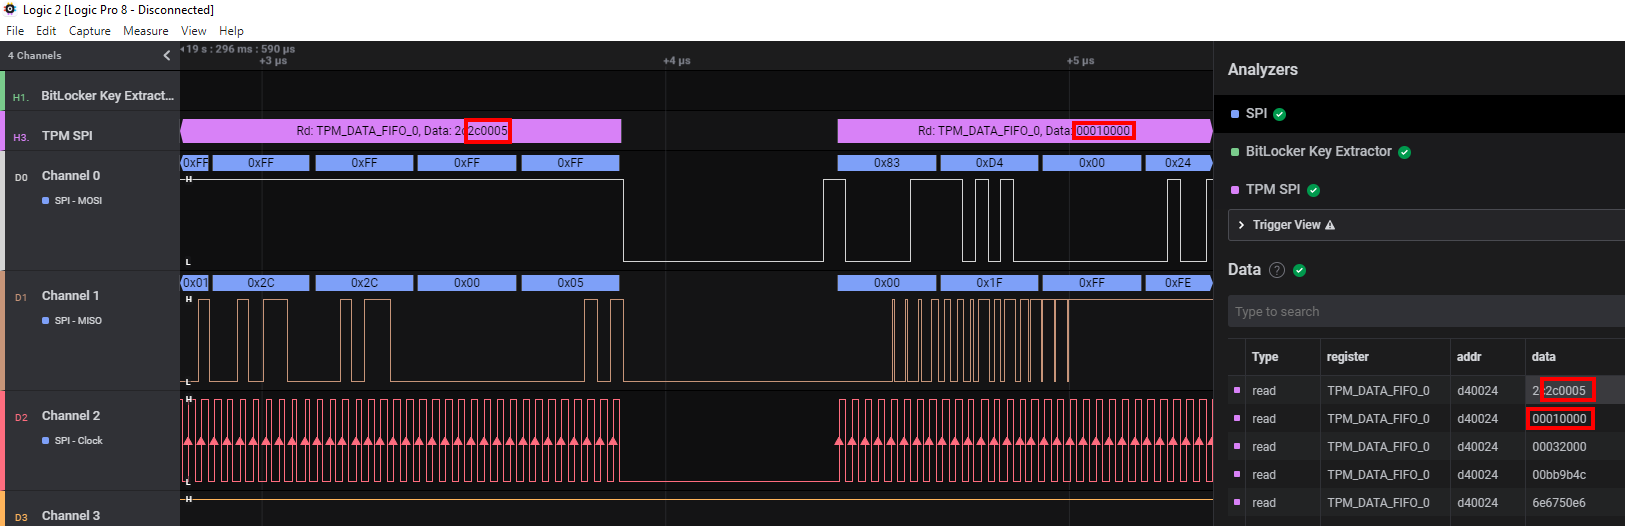
And afterwards will be followed by the actual VMK
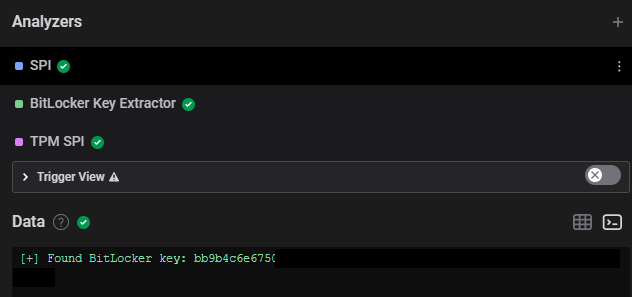
The full key can be fetched in the terminal view of Logic 2:
Now that we have the key, we can decrypt the data on a Linux box with the help of Dislocker, which Henri wrapped into a nice docker container to save you some time.
The steps are:
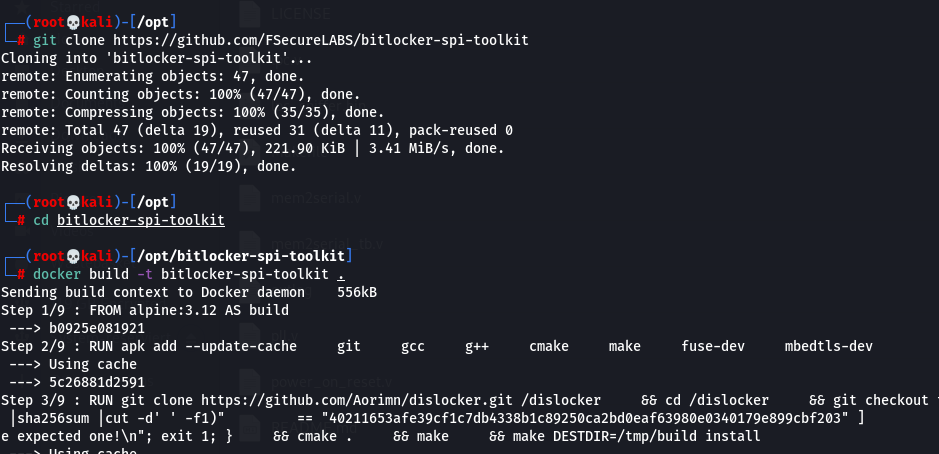
git clone https://github.com/FSecureLABS/bitlocker-spi-toolkit
cd ./bitlocker-spi-toolkit
docker build -t bitlocker-spi-toolkit .
./mount-bitlocker /dev/sdb2 bb9b4c6e6...
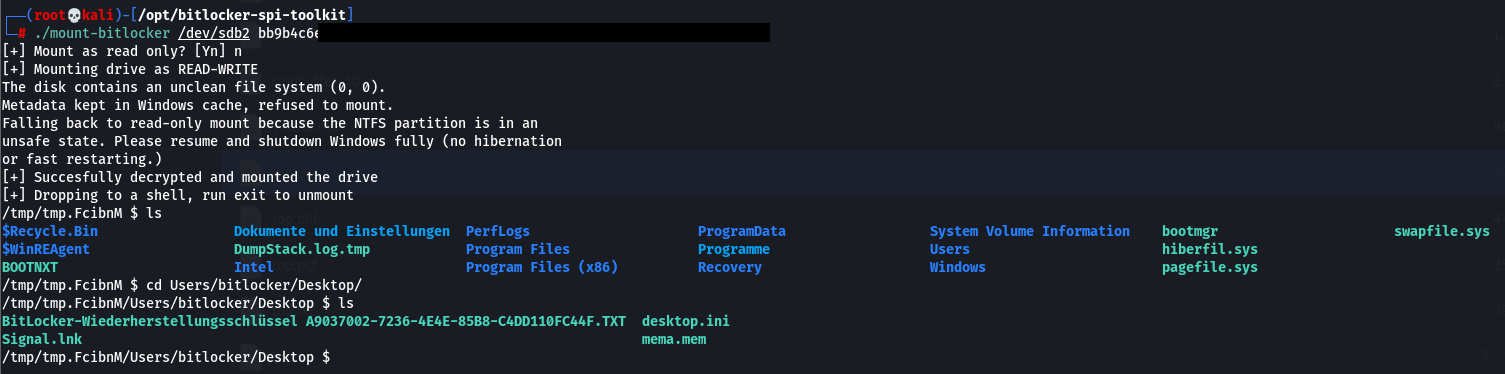
From here it is trivial for an attacker to carry out further stuff, e.g. add a local administrator or reset the local admin password, search for sensitive files and so on.
Mitigation
Well that’s fairly easy. If you want to have it secure, use an additional factor during the boot process.
Microsoft runs an excellent blog for all the scenarios here.
It doesn´t matter if you just bother your users, or implement a 3rd party solution or switch over to another product that offers MFA at the preboot phase together with SSO.
Conclusion
So that’s it.
We successfully stole the VMK from a device we had physical access to.
I disagree with the Dolosgroup people to a certain extent that these attacks can be carried out in a short amount of time - they say less than 30 minutes. The problem I see is, you probably won’t run into a situation where you exactly know the device. The use case might be during a red team engagement to get hold of a device, tore it apart, do all the attack stuff to backdoor it, and put it back into place. But the info gathering phase will take you way more than 30 minutes. If you have all the info beforehand and know exactly what to open, where to hook etc., then it might be possible to carry out everything in less than 30 minutes though.
Special thanks to Jon Aubrey & Tim from Saleae, for answering all my stupid questions, guiding me the right way and just being supportive.
I hope you enjoyed the read.
Yours faithfully - LuemmelSec.